How to Block the Sun From My Garage Door Sensor? – Wylie TX Garage Door

Blocking sun from the garage door sensor is important to ensure the proper functioning of your garage door opener. As the person looking to block the sun from my garage door sensor, I would first observe the position of the sun throughout the day to determine when it is shining directly on the sensor. This would help me figure out the best approach to block the sun and prevent false signals from the sensor.

Here are some steps from Garage Door Repair Wylie TX that you can take to block sun from the garage door sensor:

The first thing I would consider is installing a sun shield. I would go to a local home improvement store or check online retailers for sun shields that are compatible with my garage door sensor. Once I have purchased a suitable sun shield, I would clean the surface of the sensor with a soft cloth and adhesive cleaner, then carefully attach the sun shield to the sensor, making sure that it is centered and level.

If a sun shield isn’t effective, I would consider using a reflective surface. I would find a small mirror or reflective tape and attach it to the sensor or nearby surface. The reflective surface would reflect the sun’s rays away from the sensor and prevent false signals. I would ensure that the reflective surface is level and securely attached.

If neither of these options work, I would consider installing a canopy or awning to block the sun from the garage door sensor. I would consult a professional or follow the manufacturer’s instructions carefully to install the canopy or awning properly. This would require drilling holes into the garage or attaching brackets to the exterior, so I would make sure to take all the necessary precautions.

If none of these options are effective, I would consider relocating the sensor to a shaded area. This would require rewiring the sensor and possibly drilling new holes, so I would seek professional assistance. I would turn off power to the garage door opener, carefully remove the sensor from its current location, and install it in a new location that is shaded and close enough to detect the garage door’s movement.

In conclusion, as per Garage Door Repair Wylie TX, by observing the sun’s position, installing a sun shield, using a reflective surface, installing a canopy or awning, or relocating the sensor, I can block the sun from my garage door sensor and ensure that my garage door opener works smoothly. I would choose the option that is most effective and suitable for my needs, and take all the necessary precautions to ensure proper installation.

Wylie TX Garage Door

Wylie, TX

469-908-3097

How to Repair and Replace Garage Door Trim? – Sachse TX Garage Door

Garage doors are exposed to the elements, which can cause water damage through cracks or splitting of your trim. You may have noticed the signs above and it is time to replace your trim.

Paint garage door trim without replacing it first can cause many problems in the long-term. If you are thinking about selling your house or repainting your garage, updating your garage trim can make a big difference in curb appeal.

This article conducted by Garage Door Repair Sachse TX will show you what to expect from a professional painter when they come to your home to fix your trim or update your garage’s color. Let’s take another look.

Garage Door Trim Replacement

A professional painter will replace your garage door trim before painting. They will provide a step-by, detailed process. This is how it should look.

Take out the current trim

They will first need to take out the damaged, older trim. To minimize damage, they will use a knife to remove the caulking. For those who live in Arizona stucco housing, this is particularly helpful.

They should then take a tool like a cat’s claw or a screwdriver with a hammer and begin to remove the trim. They will fix it with a new trim, even if there is some minor damage.

You’ll notice a rubber part begin to fall off the garage door trim as it falls. Trim was originally made from wood so that you could see the wood. It’s now a composite that performs better.

Once all the trim is removed, any caulking and excess stucco will need to be scraped away. This will allow the new trim pieces to fit tighter.

You may also find a furring strip. This is necessary so that the replacement trim will not be damaged.

If you don’t have a furring strip running to the bottom of your garage door, your professional will use a heavier-duty adhesive. It is likely that they will use it in either direction. This is where the trimming will most often fail.

Installing the New Trim

Once the old trim is removed, the garage has been pressure washed and a 2 to 3 inch strip painted around the edges where the new trim will be placed. It should dry for about two hours.

Paint garage door trim is an option in case of future garage shifts. So there won’t be any white lines in your garage. If your garage changes, the color that is visible will match the current one.

After the paint has dried completely, they will begin measuring from the top. They will finish by measuring the sides once the trim has been placed at the top. The measurements would otherwise be 1/4 to 1/2 inch off.

The new trim can be cut using a miter saw. They will then attach the trim with finishing nails using an electric nail gun.

They will then measure the sides and place them in the same way as the top. Temporarily, the trim is held in place.

Apply the heavy-duty adhesive to the bottom of the trim and they will glue it in place before nailing. These nails should be placed every four to five inches.

After it is tacked, a thin layer of caulk should be applied along the lines of the cracks and sides where the pieces meet. Once the caulk has dried, it will be applied to the cracks.

Painting Garage Door & Trim

Once you’ve got your trim installed, it’s time to paint it. Your garage doors can add character and curb appeal to your house by being painted!

If you don’t want the trim to be included in your paint job, you can leave it as an accent to the color. It can be a nice surprise to see how white can quickly fade.

This project can be done professionally or by you. We will let you know what to do in either case.

Professional painting

To help you plan and scope the project, we will visit your house. We will then create a proposal that is based on how big the job is and what you need. As we mentioned above, they might need to replace your trim.

We can send a professional color consultant to assist you in making your choice. Even digital renderings can be provided for your home.

A professional color consultant can also work with your HOA. HOAs often have rules about what colors they allow in your home and garage.

Once you have selected your color, the crew leader will discuss all details with you. The project manager will then send you a pre production inspection document.

The crew will then begin their preparations, including pressure washing as well as any repairs that you have discussed. This is the time they will replace your garage door trim.

The painting is the next step in the process. Garage door projects shouldn’t take longer than a few days.

Final Thoughts

As stated in Garage Door Repair Sachse TX, the replacement of garage door trim will be delayed if it is covered with paint. If you plan to paint your home, it is important to replace garage door trim. Ask for professionals’ help to know better what to do best.

Sachse TX Garage Door

Sachse, TX

469-707-4978

What are the Best Ways to Keep Your Garage Door Smooth for a Long Time? – Rockwall Best Garage & Overhead Doors

Garage doors play an important role in the security of your automobile or the accessories or other tools you store inside it. So, making sure that it runs smoothly functioning of your garage door becomes an essential job. Are you aware of what you can do to keep garage doors from having an issue that causes them to fail or become less efficient in providing an efficient performance? If not, this article will help you in keeping your garage door running smoothly and in good condition for a long period of time.

Let’s discover the most effective methods according to Garage Door Repair Rockwall TX, by which you can meet your goal.

Observe for wear indicators

Look for any wear indicators, such as cracked or chipped parts, first and foremost. Check the garage doors’ major mechanical components for rust or dents. As the screaming or grinding sound is a prominent indicator of any faulty garage door, it helps to be a good listener when spotting potential indicators of damage. A fantastic technique to spot a problem is to notice whether it jerks throughout the opening or closing process or not, or makes any loud noises or not.

Clean Your Tracks

When a problem with the garage door is identified, the next step is to look for appropriate solutions, one of which is routine track cleaning. Cleaning the tracks, which are positioned on both sides of the garage door, is necessary to maintain the door’s functionality for an extended period of time. The smooth operation of the doors could be hampered by trash and clusters that begin to accumulate in the tracks. If the tracks need to be adjusted, search for experts.

Check the door’s balance

Another excellent approach to guarantee the garage doors’ trouble-free operation is to check their balance. One can examine the position of the door and determine whether the door remains in that position by pausing the garage door halfway through its full opening. Despite being stopped in the middle, if the door completely closes or opens, get professional assistance and resolve this issue immediately away.

Grease Hardware Components

At least once a month, one should oil the garage door’s hardware or moving parts. Regular lubrication of the moving parts keeps the metal components of the garage door safe from developing rust or corrosion as well as enables the door to operate perfectly and smoothly without creating any kind of friction sounds. Don’t forget to consider the lubricant’s quality as it contributes to the door’s increased effectiveness.

Decide on Professional Services

Lastly, as stated in Garage Door Repair Rockwall TX, at least once a year, choose expert garage door maintenance based on your convenience. There might be a few issues that lay undetected to ordinary sight, but not to an expert. Additionally, even if there are no such problems, servicing the garage doors on a regular basis can assist to maintain their functionality.

Rockwall Best Garage & Overhead Doors

Rockwall, Texas 75087

469-423-8082

4 Important Tips for Garage Door Maintenance – Garland Garage Door and Gates

Garage doors can fulfill their purpose perfectly only if all the elements of mechanical and electrical gears function smoothly and seamlessly by putting in their fullest effort. After a few years of continuous use local climate conditions and the resistance of the moving parts experience reduced performance over the course of the regular maintenance is necessary to ensure it operates properly. The reason is that the owners should have a basic understanding of garage doors and their technical features. Garage door repair services that are the best that offer services also provide steel doors of various styles.

Four tips from Garage Door Repair Garland TX are provided below to assist you to make the most effective decisions for the garage doors. They are as follows:

Inspection: The first step is to conduct an inspection for garage doors if you’re seeking to improve on them. Examine all the components as well as those that are vital to the door. Additionally, you need to be sure that the chains, belts, electrical connections, rollers, and bearings are in good working order. It will let you know the roles of doors.

Lubricate moving hardware door components to be lubricated using the appropriate oil. This allows them to move freely without issue. Apply oil or grease to the moving parts to ensure they are able to function properly. The components that require Lubrication include hinges, screw chains, rollers, and hinges.

Settings: The most recent garage doors are controlled electronically. They are programmed in that the door can be operated with no technical obstacles. If it’s electronic, then make an appropriate setting and adjust it to your requirements.

Door insulation: The metal used to make doors can be affected by temperatures that are high. In this case, experts recommend that the door is protected with polystyrene. Ventilation: Certain garage doors do not have adequate venting. This causes hot temperatures in summer and can cause colds in winter. It is best to improve ventilation to ensure it is more efficient.

In conclusion, in reference to Garage Door Repair Garland TX, if you want to maintain your garage doors that are safe and secure, you have to be aware of some essential points that will aid you in maintaining your door while maximizing techniques.

Garland Garage Door and Gates

517 Eastern Star Dr, Garland, TX

972-449-4177

How to Lock Garage Door – Encompass Garage Door of North Grand Prairie

Locking your Garage Door Repair Grand Prairie TX is an essential security measure that can help keep your home and belongings safe. There are different types of garage doors, and each may require a different method of locking.

In this guide, we will provide you with several methods to lock your Garage Door Repair Grand Prairie TX and keep it secure.

Method 1: Manual Garage Door Locks Most manual garage doors have a lock that you can use to secure the door. The lock is usually located on the inside of the garage door and is attached to a metal bar that slides into a hole in the track, preventing the door from opening.

Step 1: Locate the garage door lock. The lock on your garage door may be a knob or a handle that you turn to engage the lock mechanism. Check the interior side of the door and locate the lock.

Step 2: Slide the metal bar into the track. Once you have located the lock, slide the metal bar into the hole in the track. This will prevent the garage door from opening.

Step 3: Turn the knob or handle to engage the lock. Finally, turn the knob or handle to engage the lock mechanism. This will secure the garage door.

Method 2: Padlocks Another way to secure your garage door is by using padlocks. Padlocks are a simple and effective way to prevent the garage door from opening. You can use padlocks in conjunction with other locking mechanisms for added security.

Step 1: Install a hasp. The first step is to install a hasp on the garage door. A hasp is a metal plate that you attach to the door frame. It has a loop that can accommodate a padlock.

Step 2: Insert the padlock. Insert the padlock through the loop in the hasp and lock it.

Step 3: Test the padlock. Finally, test the padlock to ensure it is secure. Pull the garage door to make sure it does not open.

Method 3: Smart Locks Smart locks are a modern and convenient way to lock your garage door. These locks can be controlled using your smartphone, and you can also set them to automatically lock and unlock at specific times.

Step 1: Install the smart lock. The first step is to install the smart lock on your garage door. Follow the manufacturer’s instructions to install the lock.

Step 2: Connect the lock to your smartphone. Once the lock is installed, connect it to your smartphone using the manufacturer’s app. This will allow you to control the lock remotely.

Step 3: Set up automatic locking. Finally, set up the lock to automatically lock and unlock at specific times. You can set it to lock automatically when you leave and unlock when you return, for example.

Method 4: Garage Door Defender A garage door defender is a metal plate that you attach to the garage door track to prevent the door from opening. This is a sturdy and effective way to secure your garage door.

Step 1: Attach the defender to the track. The first step is to attach the defender to the garage door track. Follow the manufacturer’s instructions to attach the defender.

Step 2: Slide the metal bar into the defender. Once the defender is attached, slide the metal bar into it. This will prevent the garage door from opening.

Step 3: Test the defender. Finally, test the defender to ensure it is secure. Pull the garage door to make sure it does not open.

Conclusion:

Securing your garage door is an essential step in ensuring the safety of your home and belongings. There are different methods you can use to lock your garage door, including manual locks, padlocks, smart locks, and garage door defenders.

Encompass Garage Door of North Grand Prairie

625 N Carrier Pkwy, Grand Prairie, TX 75050, United States

1-972-848-6314

How to Keep Your Garage Door From Being Broken – Right On Time Garage Doors

A functional garage door could be an integral aspect of our lives. It’s something that is taken as a given until it malfunctions. The point at which it is broken can make it difficult to solve the issue straight at the moment.

It is possible that you will need to create various plans to get to the destination and take care of the issues by following the guide below based from Garage Door Repair San Antonio TX.

 Then, you must contact professionals who specialize in the maintenance and repair of the garage door. If you encounter this issue you must take every step you can to solve it quickly and efficiently. Garage doors could appear like they’re simple to repair and operate however the exact reverse could be true. They have complex electrical and hydraulic systems that can be connected in ways only someone with a lot of wisdom and understanding is able to understand.

In the event that your garage door breaks, you must contact a professional who will arrive immediately to determine the issue, provide you with a repair estimate, and then get to work right away to fix the problem. This is the sole way to avoid any further trouble and hassle.

It is possible to be enticed by the idea of fixing garage doors yourself. This is a bad idea. The good intentions you have can lead to disastrous outcomes. The problem could be even worse. You also have safety concerns to consider. Garage doors are strong and sturdy. It is not a good idea to be in danger in the unfortunate situation of having one of your body parts hurt or broken. It is important to be aware of such an incident by connecting with people who are knowledgeable and have the equipment needed to complete the repairs.

The problem can be fixed easily. If that’s the case and you contact the correct people, those you call are likely to be able to complete repairs and solve the issue in a brief amount of time. If the problem is severe the machine may need to be replaced. This is a very complex undertaking that is likely to cost more. But, it’s going to be more efficient when you leave this task in the hands of a person who knows the job. It is important to realize that not all garage repair companies actually are identical. They are not all of the same standards of value, quality as well as service and quality. The business you select must have a track record and a reputation for providing exceptional benefits and excellent service. The cost is another factor to consider. While paying for the garage door operation is a worthwhile investment but you shouldn’t have to shell out a lot of money.

Overall, in reference to Garage Door Repair San Antonio TX, the company you work with needs to live up to its word. It is essential to choose an organization that is prepared to be a stand-alone entity based on its own name and the promises it will be able to deliver. Making your garage door work once more shouldn’t be so difficult and confusing if you collaborate with the right people.

Right On Time Garage Doors

San Antonio

210-383-4422

Types of Residential Garage Door and its Advantages – BH Garage Door Repair of Forney

You’re aware that your garage door guards the contents of the garage from animals, bugs, and the weather. It’s also an attractive feature and provides a distinctive look for your house. If you’re building your first house, it’s likely that you’ve put lots of effort into choosing the right garage door. Based from Garage Door Repair Forney TX, take a look at the various types of garage doors on the market today to choose the perfect one for your new home.

Here are the types of garage doors as stated in Garage Door Repair Forney TX for residential use and see how they can enhance the value of your house.

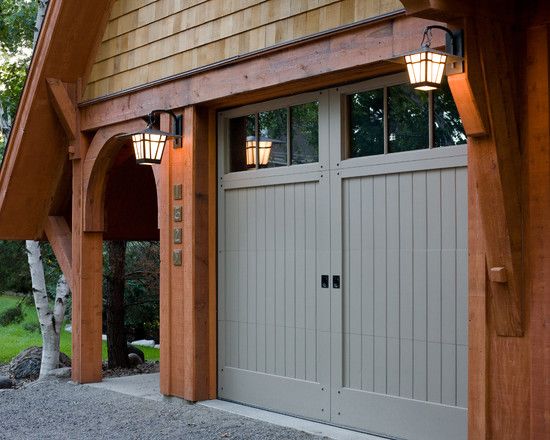
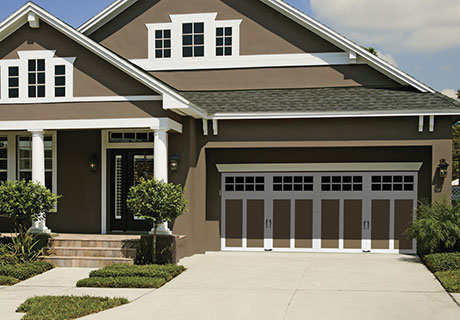
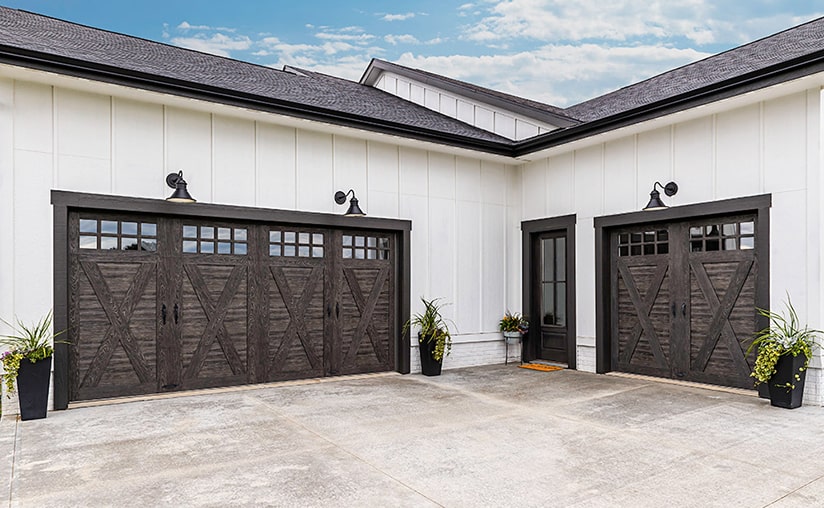
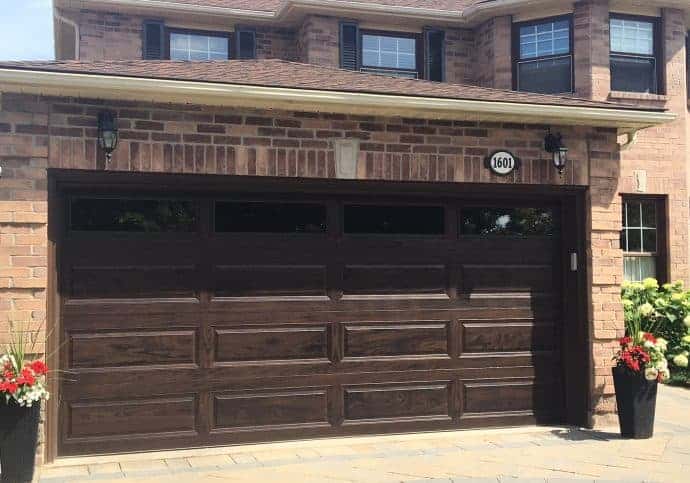
1. SWING OUT or CARRIAGE DOORS

Doors for garages that are carriage-style open from the middle part of the garage. They’re functional and stylish and resemble traditional barn doors. Garage doors of this type will give your house an authentic country feel and come in a variety of stunning styles and shades. If you have doors that open they provide plenty of storage space inside your garage. In general, garage doors are made of wood and you can also add insulation to improve their energy efficiency.

Advantages:

No overhead tracks for those who have tall ceilings within your garage, or you simply need more storage space for your ceiling, you’ll get the space you require with swing-out garage doors. It is also possible to store tall objects in your garage without being concerned about them being in the way of the track.

The aesthetic appeal of homes: Most homeowners enjoy the appearance of a swing-out door due to its rustic look. A carriage-style garage door is available in a variety of styles to satisfy your aesthetic as well as practical requirements.

They are durable and are made with a variety of panel designs that make them stronger. Through these alternatives, you’ll be able to get a door that looks nice and performs well.

Be aware that because the doors swing outwards, you’ll have to take measurements of your driveway to be sure you have enough room. The style is also more costly than other alternatives.
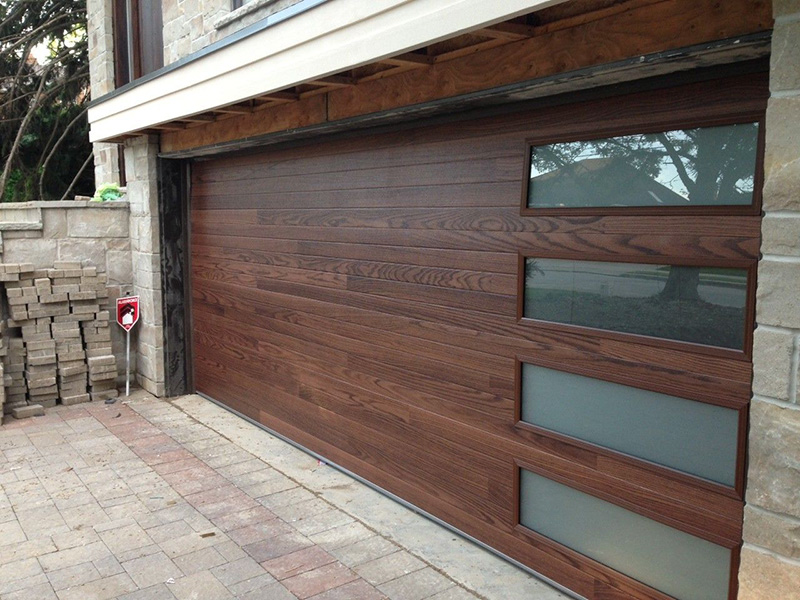
2. SLIDING DOORS

Garage doors that slide open evoke images of country life through their similarity to barn doors. Since they slide to one side, they won’t require any space within your garage. This gives you more space to store items.

Advantages:

Simple operation it is possible to manually or electronically unlock the garage door, therefore it’s functional regardless of an outage of power.

A quiet motor Garage door sliding does not generate as much sound as the other doors in garages. The motor pulls the door using less force due to its track is horizontal.

There are no overhead tracks: One of the main benefits that sliding doors have is that they do not have an overhead track. If you’re looking to use your ceiling as storage space or have a high ceiling, you can put the track of this door in the side for additional space.

Low maintenance: As the sliding door is made of panels instead of a whole piece, it is possible to replace damaged parts instead of purchasing a completely new door.

Energy efficiency: Doors that slide use less energy due to the absence of heavy hardware and equipment. This is what makes them more energy efficient than other garage doors.

Be aware that you’ll be living in a smaller garage regardless of having greater ceiling space. Also, it’s more costly and harder to clean.

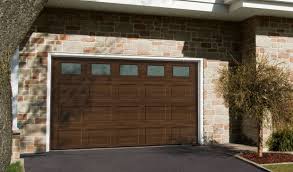
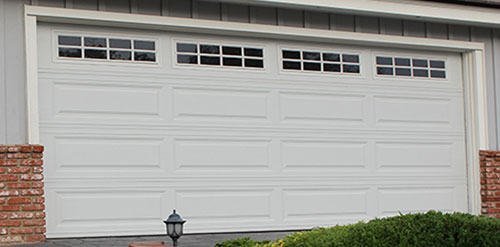
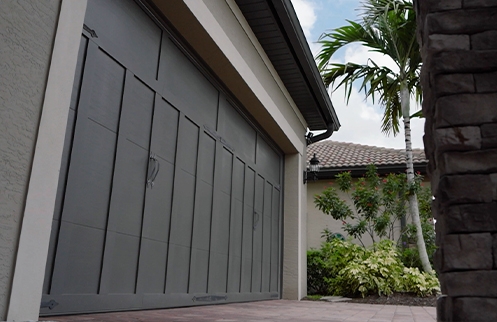
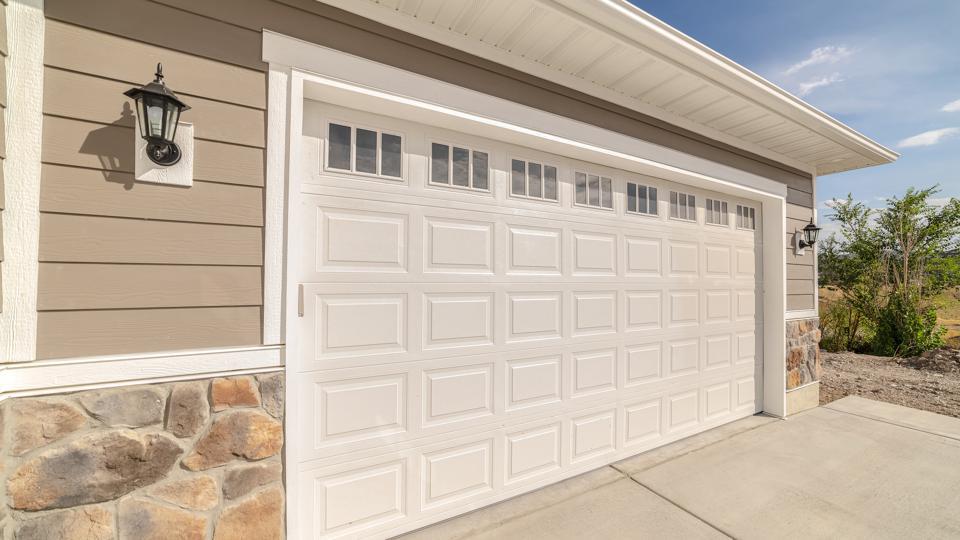
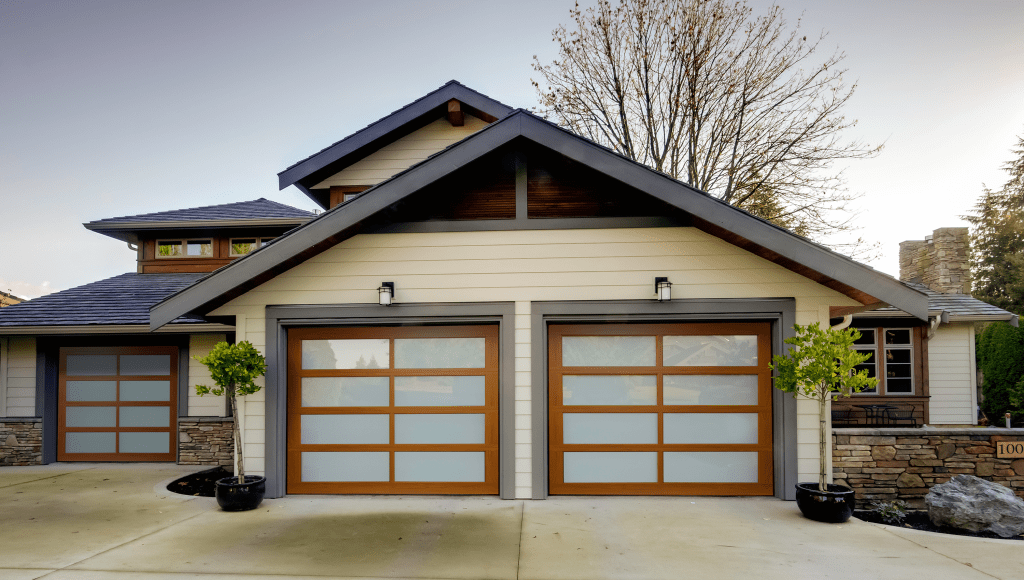
3. SECTIONAL ROLL-UP DOORS

Sectional roll-ups provide homeowners with the most simple-to-use garage doors. The doors are able to move upwards to the roof of garages, and they are generally less difficult to fix. Removing a portion is generally less costly than replacing the entire door.

Advantages:

There is no driveway space: unlike the swing-out door, the sectional roll-up garage door won’t require space in the yard when it opens.

Efficiency Sectional garage doors work with a variety of insulation. If you apply insulation to the door you’ll be able to reduce your energy costs as well as increase the comfort in your garage.

Sturdy Torsion springs keep the garage door steady when it’s only partially open. This feature will protect you and your valuables.

Simple to use: You can effortlessly control your roll-up sectional doors using a remote as well as an automated garage door opener. It is also possible to unlock the door manually using equipment in the event of an out low maintenance Sectional roll-up garage door typically made of steel and low-maintenance material. It is resistant to dents, corrosion, weather damage, and rust and it is also easy to paint it.

Numerous design options: The majority of sections of roll-up garage door permit you to select different windows, colors, and textures, as well as hardware that matches your overall theme.

Although a sectional roll-up garage door typically doesn’t face any issues because of the many components involved, it has an increased chance of making mistakes. Also, they require regular maintenance from professionals.

4. One Piece/TILT-UP

Garage doors that can swing up completely in one piece conjure images from the 1950s. They are generally heavy, even with a cantilevered spring to keep them in motion. If they are not on automated opening systems, you could be better off buying another type of door.

Advantages:

Installation is simple: Because it’s a single piece, instead of several panels, it’s simple to set up and make use of it quicker.

There’s no driveway space. Since the tilt-up doors only move vertically, it doesn’t require an extra driveway to accommodate tracks.

Reliability: Similar to the sectional overhead doors, tilt-up ones also have torsion springs that enable them to remain in place.

Remember that many tilt-up doors aren’t insulated and can pose a risk in the event that you fail to keep up with their regular maintenance.

BH Garage Door Repair of Forney

108 E Main St, Forney, TX 75126

469-820-3581

How to Set Up Garage Door Opener – Argyle Garage Door Repair

Setting up a Garage Door Repair Argyle TX opener may seem like a daunting task, but with the right tools and instructions, it can be a fairly simple process. Here are the steps you need to follow to set up your garage door opener:

Step 1: Gather the necessary tools and equipment

Before you start setting up your Garage Door Repair Argyle TX opener, you need to make sure you have all the necessary tools and equipment. The most important tools you will need are a drill, screwdriver, pliers, level, and a ladder. You should also have the following items on hand:

  • A garage door opener kit
  • A power drill and bits
  • A measuring tape
  • Screws and bolts
  • Wires and connectors
  • A remote control

Step 2: Prepare the garage door for installation

Before you can install the garage door opener, you need to prepare the garage door. This involves making sure that the garage door is properly balanced, lubricated, and in good working condition. You should also make sure that the garage door tracks are clear of debris and that the springs are properly tensioned. If the garage door is not in good working condition, you should fix any issues before attempting to install the garage door opener.

Step 3: Install the mounting brackets

The next step is to install the mounting brackets for the garage door opener. The mounting brackets will hold the garage door opener in place. To install the mounting brackets, you need to:

  • Measure the distance between the garage door tracks
  • Mark the location for the mounting brackets
  • Use a power drill to create pilot holes for the screws
  • Install the mounting brackets with screws and bolts

Make sure that the mounting brackets are level and securely attached to the garage door frame.

Step 4: Install the garage door opener

Once the mounting brackets are in place, you can install the garage door opener itself. To do this, you need to:

  • Attach the motor to the mounting brackets with bolts
  • Install the rail to the motor with screws
  • Install the chain or belt to the rail and the trolley
  • Install the trolley to the rail
  • Connect the garage door opener to the power source

Make sure that all of the components are securely attached and aligned properly. You should also test the garage door opener to make sure it is functioning properly.

Step 5: Connect the safety sensors

The safety sensors are an important component of the garage door opener. They detect when an object or person is in the path of the garage door and prevent it from closing. To connect the safety sensors, you need to:

  • Attach the safety sensors to the garage door tracks
  • Connect the safety sensor wires to the garage door opener
  • Test the safety sensors to make sure they are working properly

Step 6: Program the remote control

The final step is to program the remote control for the garage door opener. To do this, you need to:

  • Press the program button on the garage door opener
  • Press the button on the remote control
  • Wait for the garage door opener to beep or flash to confirm the programming

You may need to repeat this process for each remote control that you want to use with the garage door opener.

Conclusion:

Setting up a garage door opener is not a difficult task, but it does require some basic knowledge and tools. By following these steps and taking the necessary precautions, you can install a garage door opener in your home with ease. Remember to always read the instructions carefully and consult a professional if you are unsure about any aspect of the installation process.

Argyle Garage Door Repair

1004 Stonecrest Rd, Argyle, TX 76226, United States

1-940-326-5646

How to Repair Your Garage Door Opener? – Right on Time Garage Doors of San Antonio

Garage door openers are essential for modern-day living. They allow us to easily open and close our garage doors without having to get out of our cars. However, when they malfunction, it can be frustrating and inconvenient. In this article, we will discuss how to repair a garage door opener.

Before we dive into the repair process, let’s first discuss the common reasons why a garage door opener may malfunction as stated in Garage Door Repair Denison TX:

  1. Dead batteries in the remote control or keypad
  2. The safety sensors are blocked or misaligned
  3. The door track is dirty or obstructed
  4. The door opener motor is worn out or faulty
  5. The gears or chains on the opener are damaged
  6. The limit switch needs adjustment

Now, let’s move on to the repair process. Please keep in mind that repairing a garage door opener can be dangerous, especially if you are not familiar with the tools and equipment required. If you are not comfortable with performing these repairs, it is recommended that you contact a professional.

Step 1: Check the Batteries in the Remote Control or Keypad

The first thing you should check is the batteries in the remote control or keypad. If the batteries are dead, the opener will not function. Replace the batteries and test the opener.

Step 2: Check the Safety Sensors

If the opener still does not work, the safety sensors may be blocked or misaligned. Check to see if there are any objects blocking the sensors. If there are no obstructions, check to see if the sensors are aligned properly. The sensors should be facing each other and there should be no obstructions between them.

Step 3: Clean the Door Track

If the safety sensors are functioning properly, the next step is to check the door track. The door track should be clean and free of debris. Use a cloth to wipe down the track and remove any obstructions.

Step 4: Check the Door Opener Motor

If the door track is clear and the safety sensors are functioning properly, the issue may be with the door opener motor. Check to see if the motor is running. If it is not, it may be faulty and need to be replaced.

Step 5: Check the Gears and Chains

If the motor is running, the issue may be with the gears or chains on the opener. Check to see if they are damaged or worn out. If they are, they may need to be replaced.

Step 6: Adjust the Limit Switch

If the opener is still not functioning properly, the issue may be with the limit switch. The limit switch determines how far the door opens and closes. If the switch is misaligned or needs adjustment, the opener may not function properly. Refer to your owner’s manual for instructions on how to adjust the limit switch.

In conclusion, as stated in Garage Door Repair Denison TX, repairing a garage door opener can be a complex task. It is recommended that you contact a professional if you are not comfortable with performing these repairs. However, if you follow these steps and take the necessary safety precautions, you may be able to repair your garage door opener yourself. Remember to always prioritize safety and use caution when working with electrical equipment.

Right on Time Garage Doors of San Antonio

341 St Cloud, San Antonio, TX 78228

210-963-5866

What is the Best Garage Door Opener? – Princeton Garage Door Experts

As a homeowner, I recently found myself in the market for a new garage door opener. After researching several options and considering factors such as power, noise level, safety features, and connectivity, I believe the Chamberlain B970 is the best garage door opener on the market, refer to Garage Door Repair Princeton TX.

The Chamberlain B970 is a belt-drive garage door opener that comes with a powerful 1.25 horsepower motor. This is particularly important for me because I have a heavy garage door made of insulated steel. With the B970, I am confident that the opener can easily handle the weight of the door.

Another great feature of the B970 is its MyQ technology, which allows me to control the garage door using a smartphone app. This means I can open or close the door from anywhere, and I can also receive alerts when the door is opened or closed. This has been particularly useful when I am away from home and want to make sure my garage is secure.

In addition, the B970 has built-in safety features, such as a safety sensor that stops the door from closing if there is an obstruction. This gives me peace of mind knowing that my family and pets are safe from accidents.

Overall, as stated in Garage Door Repair Princeton TX, I believe the Chamberlain B970 is the best garage door opener for homeowners who are looking for a powerful, convenient, and safe option. The price point may be higher than some other options on the market, but the added features and peace of mind make it well worth the investment.

Princeton Garage Door Experts

114 N 2nd St #5, Princeton, TX 75407, United States

469-281-7310

How to Change Code on Garage Door Keypad – Dragon Garage Door & Gates

Changing the code on a Garage Door Repair Southlake TX keypad is a relatively simple process that can be accomplished in just a few steps.

In this guide, I’ll provide a step-by-step process for changing the code on a Garage Door Repair Southlake TX keypad.

Step 1: Locate the “Learn” Button

The first step in changing the code on a garage door keypad is to locate the “Learn” button on your garage door opener. This button is typically located on the back of the opener, near the antenna wire. It may also be located on the side or front of the opener.

Step 2: Clear the Existing Code

Once you have located the “Learn” button, press and hold it down for approximately 10 seconds until the indicator light on the opener turns off. This will clear the existing code from the opener’s memory.

Step 3: Enter the New Code on the Keypad

Next, enter the new code that you would like to use on the keypad. Be sure to choose a code that is easy for you to remember but difficult for others to guess. Typically, garage door keypads allow for four to six-digit codes.

Step 4: Press the “Learn” Button on the Opener

After entering the new code on the keypad, press the “Learn” button on the garage door opener. The indicator light on the opener will flash to indicate that it is ready to learn a new code.

Step 5: Enter the New Code on the Keypad Again

Once the indicator light on the opener is flashing, enter the new code on the keypad a second time. This will confirm that the new code has been successfully programmed into the opener’s memory.

Step 6: Test the New Code

To ensure that the new code is working properly, test it by pressing the numbers on the keypad and checking that the garage door opens and closes as expected.

Step 7: Repeat the Process for Additional Keypads

If you have multiple garage door keypads, you will need to repeat the above process for each keypad to ensure that all keypads are updated with the new code.

Step 8: Secure the Keypad

Once you have successfully programmed the new code into the garage door opener, be sure to secure the keypad to prevent unauthorized access. This can be done by simply removing the batteries from the keypad or by locking the keypad cover with a key.

In conclusion, changing the code on a garage door keypad is a simple process that can be accomplished in just a few steps. By following the above steps, you can update the code on your garage door keypad to keep your home and belongings safe and secure.

Dragon Garage Door & Gates

351 Central Ave #7, Southlake, TX 76092, United States

1-817-587-0445

How to Reset Garage Door Opener – Murphy Garage Door & Gates

I’d be happy to share my experience of resetting my garage door opener as stated in Garage Door Repair Murphy TX:

The first thing I did was locate the “learn” button on the back of the garage door opener motor unit. It’s important to note that the location of the learn button may vary depending on the model of your garage door opener.

Once I located the learn button, I pressed and held it down for about 10-15 seconds until the light on the motor unit turned off. This indicated that the garage door opener was now in “learn” mode and ready to receive new instructions.

After that, I went to my remote control and pressed and held down the button that I wanted to program. It’s important to note that if you have multiple remotes, you’ll need to reset each one individually.

As I held down the button on the remote control, I observed the light on the motor unit. It should start to flash, indicating that it has received the new instructions.

Once the motor unit flashed its light, I released the button on the remote control and waited a few seconds for the garage door opener to respond.

Finally, I tested the remote control by pressing the programmed button to make sure that the garage door opened and closed as expected. If it did, then the reset was successful.

If the garage door didn’t operate as expected, it’s possible that there is a problem with the garage door itself or the opener may require further troubleshooting. In this case, it’s recommended to consult the owner’s manual or seek the assistance of a professional garage door technician.

In summary, according to Garage Door Repair Murphy TX, resetting a garage door opener is a relatively simple process that can be accomplished in just a few basic steps. By locating the learn button, pressing and holding it down, programming the remote control, and testing the opener, it’s possible to reset the system and get it working properly again.

Murphy Garage Door & Gates

223 FM 544 #16, Murphy, TX 75094, United States

469-425-7816

How Much is a New Garage Door – Grayson County Garage Door Repair

The cost of a new garage door can vary depending on several factors, such as the type of door, material, size, style, and installation fees. The most common types of garage doors are sectional, roll-up, and side-hinged.

Here is a guide from Garage Door Repair Sherman TX:

The material of the garage door is another significant factor in the cost. Wooden garage doors are the most expensive option, steel garage doors are a popular choice due to their durability and low maintenance, aluminum garage doors are lightweight and require little maintenance, and fiberglass garage doors are a good option for those looking for a lightweight and durable door.

The size and style of the garage door can also affect the cost. Standard size doors are typically 8 to 10 feet wide and 7 to 8 feet tall. Larger doors can cost more, depending on the size. The style of the door, such as a traditional or contemporary design, can also affect the cost.

Installation fees vary depending on the contractor, location, and complexity of the installation. The cost of installation can range from $200 to $1,000 or more.

Overall, as stated in Garage Door Repair Sherman TX, the cost of a new garage door can range from $750 to $4,000 or more, depending on the type, material, size, style, and installation fees. It’s essential to do your research and compare prices from different manufacturers and contractors to find the best deal.

Grayson County Garage Door Repair

1940 Everheart Rd, Bells, TX 75414, United States

903-500-7205

How to Program Garage Door Opener to Car – South Denton Overhead Garage Door

Programming a garage door opener to a car can be a bit tricky, but with some patience and following the right steps, you can easily accomplish it.

In this article, we will guide you through the process step by step:

Before we begin, it’s essential to note that different car models may have different methods of programming a Garage Door Repair Roanoke TX opener. Therefore, we recommend that you always consult your car’s owner manual to ensure that you follow the correct procedure.

Step 1: Determine Your Garage Door Opener Type

The first step is to determine what type of garage door opener you have. There are three common types of garage door openers: chain-driven, belt-driven, and screw-driven. To find out what type of garage door opener you have, look for the motor unit located above the garage door. Once you have determined the type of garage door opener you have, you can proceed to the next step.

Step 2: Locate the Learn Button on Your Garage Door Opener

The next step is to locate the learn button on your garage door opener. The learn button is usually located on the back of the motor unit or on the control panel. It’s essential to note that the learn button color may vary depending on the manufacturer. The button is usually round and may have the word “learn” or “smart” written on it.

Step 3: Clear All the Codes

Before programming a new remote control, it’s crucial to clear all the existing codes on the garage door opener. To do this, press and hold the learn button on the garage door opener until the LED light turns off. This may take about 10 to 15 seconds.

Step 4: Prepare Your Car

Now it’s time to prepare your car for programming. Start by turning the ignition on and make sure the car is in the “Park” position. Also, ensure that all the car windows and doors are closed.

Step 5: Program the Remote Control

The next step is to program the remote control to the garage door opener. To do this, press and hold the learn button on the garage door opener until the LED light turns on. While the LED light is on, press and hold the button on the remote control that you want to use to open the garage door. Hold the button until the LED light on the garage door opener blinks, indicating that the remote control has been programmed.

Step 6: Test the Remote Control

Once you have programmed the remote control, it’s time to test it. Stand outside the garage door and press the button on the remote control. The garage door should open or close depending on the button you pressed. If the garage door does not respond, repeat the programming process from step 3.

Step 7: Repeat the Process for Other Remote Controls

If you have multiple remote controls that you want to program, repeat the process from step 5 for each remote control.

Conclusion

Programming a Garage Door Repair Roanoke TX opener to a car is a simple process that requires following the right steps. However, if you encounter any difficulties, always refer to your car’s owner manual or contact a professional garage door technician for assistance. Remember to always take safety precautions when working with garage door openers, such as unplugging the unit before servicing it.

South Denton Overhead Garage Door

112 US-377 #9, Roanoke, TX 76262, United States

1-817-873-2942

How to Fix Garage Door Opener – BH Garage Door & Gates of Celina

If you’re experiencing problems with your garage door opener, don’t worry, you’re not alone. As someone who has gone through this before, I understand how frustrating it can be.

However, with a few simple steps from Garage Door Repair Celina TX, you can easily fix your garage door opener and have it working like new again.

First, I would check the power source. I’ve had issues with the outlet before, and simply plugging it in or resetting the breaker fixed the problem. If the opener is battery-operated, I would replace the batteries and try again.

Next, I would check the sensors. I’ve had times when the sensors were dirty or misaligned, and this prevented the door from closing properly. Cleaning or adjusting the sensors can usually fix the issue.

If the remote control isn’t working, I would check the batteries and make sure that the remote control is within range of the opener. I’ve also had instances where an object was blocking the signal, so I would make sure that there are no obstructions in the way.

If the garage door isn’t opening or closing all the way, I would check the door balance. The door should be able to move up and down smoothly, and if it’s not balanced, it can put strain on the opener and cause it to malfunction.

If the opener is making a strange noise, I would check the chain or belt. A loose or damaged chain or belt can cause the opener to malfunction, and tightening or replacing it can usually fix the problem.

Lastly, I would lubricate the moving parts of the opener, including the chain or belt, rollers, and hinges. This can help the opener work more smoothly and prevent it from breaking down.

If after all these steps the opener still isn’t working, it may be time to call a professional. They can diagnose the problem and make the necessary repairs to get your opener working again.

In conclusion, as stated in Garage Door Repair Celina TX, fixing a garage door opener can seem daunting, but with a bit of troubleshooting, it can be easily fixed. By following these steps, I’ve been able to fix my garage door opener and have it working like new again.

BH Garage Door & Gates of Celina

102 N Ohio St #4A, Celina, TX 75009, United States

214-949-4432

How to Insulate a Garage Door – BH Garage Door & Gate of Frisco

As someone who has recently insulated my own garage door, I can share with you the steps that I took. Insulating your garage door can make a huge difference in the temperature and comfort of your garage, as well as help you save on energy costs.

Here’s how I did it as stated in Garage Door Repair Frisco TX:

  1. Determine the Type of Garage Door The first thing I did was determine the type of garage door I had. Mine was a metal door, which required a different type of insulation than wood or fiberglass doors.
  2. Choose the Insulation Material Next, I researched different insulation materials and decided to go with fiberglass batt insulation. It was affordable, easy to install, and provided good thermal insulation.
  3. Measure the Garage Door Panels I measured the panels of my garage door to determine how much insulation material I would need. I measured each panel individually to account for any variations in size.
  4. Clean the Garage Door Panels Before installing the insulation material, I cleaned the garage door panels with a damp cloth to remove any dirt, dust, or debris.
  5. Install the Insulation Material To install the fiberglass batt insulation, I followed these steps:
  • Cut the insulation material to the size of each panel.
  • Place the insulation material into each panel, ensuring it fits snugly.
  • Use duct tape to secure the insulation material in place.
  1. Install a Garage Door Insulation Kit I also considered buying a garage door insulation kit, which would have made installation even easier. However, I decided to go with the DIY approach.
  2. Install Weatherstripping To maximize the insulation benefits of the garage door, I installed weatherstripping around the edges of the door. I bought weatherstripping at a hardware store and installed it using adhesive.
  3. Seal the Garage Door Windows Finally, I sealed the windows on my garage door to prevent heat loss. I used a window insulation kit, which contained plastic film and double-sided tape. I cut the plastic film to the size of the windows, applied the double-sided tape around the edges of the window frame, and stuck the plastic film onto the tape. I used a hairdryer to shrink the plastic film and remove any wrinkles.

Overall, in reference to Garage Door Repair Frisco TX, insulating my garage door was a relatively simple and straightforward process. It has made a noticeable difference in the temperature and comfort of my garage, and I’m already seeing savings on my energy bills. I would definitely recommend this project to anyone looking to make their garage more energy-efficient and comfortable.

BH Garage Door & Gate of Frisco

4350 Main St Suite 160, Frisco, TX 75034

972-366-4079

How to Adjust a Garage Door? – Plano East Garage Door

If you’re like me and want to save money by adjusting your garage door yourself, it’s important to take the proper safety precautions and follow the right steps.

Here’s how I adjusted my garage door based from Garage Door Repair Plano TX:

Step 1: Checked the Springs

Before I started adjusting my garage door, I checked the springs to make sure they weren’t damaged. I made sure the door was closed and disconnected from the opener before checking the springs. If I noticed any damage or wear, I would have called a professional garage door technician to make any necessary repairs.

Step 2: Checked the Tracks

I checked the tracks on the garage door to make sure they were properly aligned. I looked for gaps between the rollers and the track. If I noticed any gaps, I loosened the bolts on the track brackets and gently tapped the track into place with a rubber mallet. Once the track was aligned, I tightened the bolts back up.

Step 3: Adjusted the Springs

Since my garage door was difficult to open and close, I needed to adjust the springs. However, I knew that adjusting the springs can be dangerous, so I called a professional garage door technician to make the necessary adjustments.

Step 4: Adjusted the Limit Switches

I noticed that my garage door didn’t close all the way, so I needed to adjust the limit switches. I located the switches on the side of the opener unit and used a screwdriver to turn the switches in small increments until the door opened and closed smoothly and fully.

Step 5: Adjusted the Force

My garage door opener was putting too much pressure on objects in its path, so I needed to adjust the force. I located the force adjustment screws on the opener unit and used a screwdriver to turn the screws in small increments until the door opened and closed smoothly and without reversing.

Step 6: Tested the Door

After making all the necessary adjustments, I tested the door to make sure it operated smoothly and safely. I closed the door and tested the opener to make sure it stopped when it was supposed to and reversed when it hit an object.

Adjusting my garage door took some time and effort, but it was worth it to save money on professional repairs.

By following these steps from Garage Door Repair Plano TX and taking the proper safety precautions, you can adjust your garage door to ensure it operates smoothly and safely. However, if you’re not comfortable making adjustments yourself, it’s always best to call a professional garage door technician to make any necessary repairs.

Plano East Garage Door

1201 E Plano Pkwy B, Plano, TX 75074, United States

972-640-7299

Why Won’t my Garage Door Close? – MF Solutions

If your garage door won’t close, there are several potential reasons why based from Garage Door Repair. In this guide, I’ll walk you through some of the most common causes of this problem and what you can do to fix them.

  1. Obstructions in the Path of the Door

One of the most common reasons why a garage door won’t close is because there are obstructions in the path of the door. Check for anything that might be blocking the door, such as a bike or a tool, and remove it. The garage door opener has a safety feature that prevents the door from closing if it senses an obstruction.

  1. Misaligned Photo Eye Sensors

Another common reason why a garage door won’t close is because the photo eye sensors are misaligned or dirty. These sensors are located on each side of the garage door and send an invisible beam across the opening. If the beam is broken, the door won’t close. Check to make sure that the sensors are properly aligned and clean. Wipe them down with a clean, dry cloth if necessary.

  1. Broken Springs

The springs on your garage door are responsible for helping to support the weight of the door as it opens and closes. If one or both of these springs are broken, the door won’t close properly. If you suspect that this is the issue, it’s best to call a professional to repair or replace the springs.

  1. Malfunctioning Garage Door Opener

Another potential cause of a garage door that won’t close is a malfunctioning garage door opener. The opener may be experiencing a technical issue that is preventing it from functioning properly. Try resetting the opener by unplugging it and plugging it back in. If that doesn’t work, you may need to contact a professional to diagnose and repair the problem.

  1. Power Outage

If there has been a power outage, the garage door opener may not be functioning properly.

Something went wrong

Check to see if the lights on the opener are working, as this will indicate whether or not it is receiving power. If the lights are not working, try plugging in a different device to the outlet to confirm whether or not there is power. If the outlet is not working, you may need to call an electrician to fix it.

  1. Broken or Damaged Cables

The cables on your garage door are responsible for helping to lift and lower the door. If one or more of these cables are broken or damaged, the door may not close properly. If you suspect that this is the issue, it’s best to call a professional to repair or replace the cables.

  1. Incorrect Settings on the Garage Door Opener

Finally, it’s possible that the settings on your garage door opener are incorrect. Make sure that the travel limit settings are set correctly, as this can affect the door’s ability to close. Consult the owner’s manual for your garage door opener for instructions on how to adjust the settings.

In conclusion, in reference to Garage Door Repair, there are many potential reasons why a garage door won’t close. If you’ve checked for obstructions, aligned the sensors, and reset the opener and it still won’t close, it’s best to call a professional to diagnose and repair the problem. By addressing the issue promptly, you can ensure that your garage door remains functional and secure.

MF Solutions

9118 Elmwood Dr, Niles, IL 60714, United States

224-434-1780

How to Replace Garage Door Opener – Affordable Garage Door Repairs of Indianapolis, LLC

Replacing a garage door opener may seem like a daunting task, but it is not as difficult as it may seem. Recently, I replaced my garage door opener, and I can say that it was a relatively easy process once I understood the steps involved. In this guide from Garage Door Repair Indianapolis, I’ll walk you through the steps that I followed to replace my garage door opener.

Step 1: Preparation

Before you start replacing your garage door opener, make sure that you have all the necessary tools at your disposal. You will need a ladder, a socket wrench set, pliers, a screwdriver, and of course, the new garage door opener. Ensure that the new opener is compatible with your garage door, and that it has all the necessary components for installation.

Step 2: Disconnect the Power

The first step in replacing a garage door opener is to disconnect the power to the existing opener. This can be done by unplugging the opener from the power source or turning off the circuit breaker that controls the opener. This step is essential for your safety.

Step 3: Remove the Old Opener

With the power disconnected, the next step is to remove the old opener. Start by using your socket wrench set to remove the brackets that hold the old opener in place. Be careful not to damage the mounting brackets or any other components of the garage door.

Step 4: Install the New Opener

Once you have removed the old opener, it is time to install the new one. Begin by following the manufacturer’s instructions for installing the mounting brackets for the new opener. Ensure that the brackets are securely attached to the ceiling and that they are level.

Next, attach the rail to the mounting bracket, following the manufacturer’s instructions. Attach the trolley to the rail and connect the arm to the trolley. Finally, attach the motor unit to the mounting bracket and connect the wires according to the manufacturer’s instructions.

Step 5: Test the New Opener

Once the new opener is installed, you should test it to ensure that it works correctly. This involves adjusting the opener’s settings, including the force and travel limit settings. Follow the manufacturer’s instructions for adjusting these settings, and test the opener by opening and closing the garage door several times.

Step 6: Connect the Power

After testing the new opener, it is time to connect the power. This is typically done by plugging the opener into the power source or turning on the circuit breaker that controls the opener. Double-check to ensure that the power is connected correctly and that there are no loose wires.

Step 7: Secure the Opener

Finally, secure the new opener in place by using your socket wrench set to tighten the mounting brackets. Ensure that the opener is securely attached to the ceiling, and that all the components are appropriately aligned.

In conclusion, based on Garage Door Repair Indianapolis, replacing a garage door opener is a relatively easy process that requires some preparation, care, and attention to detail. Following these steps will help you successfully replace your garage door opener and keep your garage door functioning properly and safely. Always ensure that you follow the manufacturer’s instructions and take all necessary safety precautions to ensure a successful outcome. With some patience and care, you can replace your garage door opener with confidence.

Affordable Garage Door Repairs of Indianapolis, LLC

Indianapolis

317-372-5337

How to Reset a LiftMaster Garage Door Opener – Team Taylor Doors

I can guide you through the process of resetting your LiftMaster garage door opener. Before we begin, it’s important to note that the specific steps for resetting your LiftMaster garage door opener may vary depending on the model and age of your opener. Therefore, it’s always a good idea to consult your owner’s manual for specific instructions.

I can provide you with detailed instructions on what to do based from Kansas City Garage Door Repair.

Step 1: Disconnect the Power

To begin the reset process, you will first need to disconnect the power to your LiftMaster garage door opener. You can do this by unplugging the opener from the electrical outlet or by turning off the circuit breaker that powers the opener.

Step 2: Locate the Learn Button

Next, you will need to locate the “Learn” button on your garage door opener. This button is typically located near the antenna wire on the back or side of the opener. It may be labeled “Learn” or “Program.”

Step 3: Press and Hold the Learn Button

Once you have located the Learn button, press and hold it down for about 6 seconds. You should see the LED light on the opener flash once, indicating that the opener’s memory has been cleared.

Step 4: Release the Learn Button

After holding down the Learn button for 6 seconds, release the button. The LED light on the opener should turn off.

Step 5: Program the Remote

Next, you will need to reprogram your remote control to work with your LiftMaster garage door opener. To do this, press and release the Learn button on the opener. The LED light on the opener should start flashing.

Step 6: Press the Remote Button

While the LED light on the opener is flashing, press the button on your remote control that you want to use to open and close your garage door. The LED light on the opener should flash again, indicating that the remote has been programmed.

Step 7: Test the Remote

To make sure that the remote control is working properly, stand in your garage and press the button on the remote control. The garage door should open and close. If it doesn’t, repeat steps 5 and 6 to reprogram the remote control.

Step 8: Reconnect the Power

Once you have successfully reset and reprogrammed your LiftMaster garage door opener, you can reconnect the power to the opener by plugging it back in or turning the circuit breaker back on.

In summary, according to Kansas City Garage Door Repair, to reset your LiftMaster garage door opener, you will need to disconnect the power, locate the Learn button, press and hold the Learn button, release the Learn button, program the remote, test the remote, and finally, reconnect the power. Always refer to your owner’s manual for specific instructions for your particular model.

Team Taylor Doors

210 SW Market St Suite 144, Lee’s Summit, MO 64063, United States

816-408-6999